FreeRTOS Unleashed - Adding a Heartbeat... to the Hand?
[This Week’s Update]
Remember that ESP32 hand exoskeleton I’ve been tinkering with? Well, it just got a serious upgrade. We’re talking proper FreeRTOS multithreading (cause I’m a muppet and wasn’t utalising it properly previously…), dual-core utilization, and—here’s the thing I’ve been most excited for—real-time heart rate monitoring. Because apparently, I thought controlling servos with FreeRTOS wasn’t complicated enough.
The Story So Far (Quick Recap)
For those just joining the party, this project started as a humble Arduino servo controller during my Bachelor’s. Think breadboard spaghetti and a single button. Fast forward through several iterations:
- Phase 1: Arduino Uno + breadboard chaos
- Phase 2: ESP32 upgrade with basic FreeRTOS
- Phase 3: BLE mobile control (goodbye button mashing)
- Phase 4: Full MQTT + MariaDB + Grafana analytics pipeline all in docker containers
- Phase 5: New sensors! (GY-MAX30102 heart rate sensor so far)
Each phase taught me something new, but I kept feeling like I was barely scratching the surface of what the ESP32 could actually do. Turns out, I was right.
🧠 The FreeRTOS Awakening
Here’s the thing about FreeRTOS—most tutorials show you how to blink an LED across two cores and call it “multithreading.” That’s like using a Ferrari to deliver pizza. Sure, it works, but you’re missing the point entirely. I get they’re supposed to get your feet wet but ya know..
I was guilty of this too. My previous “FreeRTOS” implementation was basically Arduino code with extra steps. One main loop doing everything, maybe a task or two for good measure. Classic.
What Changed?
I completely restructured the entire system into a proper 8-task architecture that actually utilizes both cores:
Core 0 (Protocol Core):
- BLE Communication Task (Priority 2)
- MQTT Publisher Task (Priority 1)
- WiFi Manager Task (Priority 1)
- System Monitor Task (Priority 1)
Core 1 (Application Core):
- Servo Controller Task (Priority 3)
- Heart Rate Monitor Task (Priority 3)
- Session Manager Task (Priority 2)
- Command Processor Task (Priority 2)
Each task has its own stack, priority level, and specific responsibilities. No more “do everything in loop()” nonsense. My god once again BLE giving me greif.
💓 Enter the GY-MAX30102
But wait, there’s more! (I sound like a terrible infomercial, I said you buy one…)
The real game-changer was adding the GY-MAX30102 heart rate and pulse oximetry sensor. This little beast can detect:
- Heart rate (BPM)
- Blood oxygen saturation (SpO2)
- Signal quality
- Finger presence detection
I dont like it.. Keeps telling me I need to exercise. Ew.
Why Heart Rate Monitoring?
Good question. Rehabilitation isn’t just about moving fingers—it’s about understanding the patient’s physiological response. Are they stressed? Relaxed? Pushing too hard? Heart rate and SpO2 give us that insight.
Plus, it’s just really cool to see your pulse in real-time on a web dashboard. Don’t judge the data…

🔧 The Technical Deep Dive
I2C Communication Drama
The MAX30102 communicates over I2C, which sounds simple until you realize it’s actually a MAX30102 chip, not a MAX30100, and half the libraries on the internet don’t work with it. Classic Arduino ecosystem moment.
Solution? Raw I2C communication. Sometimes you just have to roll your own:
// Finger detection using IR threshold
uint32_t irValue = readFIFO();
bool fingerDetected = (irValue > 50000);
The sensor sits at I2C address 0x57 (fixed adress) and pumps out IR/Red light values around 130k/110k when a finger is present. From there, it’s just math to calculate heart rate and SpO2.
Real-Time Data Pipeline
Here’s where the FreeRTOS architecture really shines. The Heart Rate task runs independently on Core 1, continuously sampling the sensor and publishing data via MQTT:
{
  "device_id": "ESP32_001",
  "timestamp": "2025-06-17T16:45:23Z",
  "heart_rate": 92,
  "spo2": 98,
  "signal_quality": "good",
  "finger_detected": true,
  "session_id": "session_123"
}
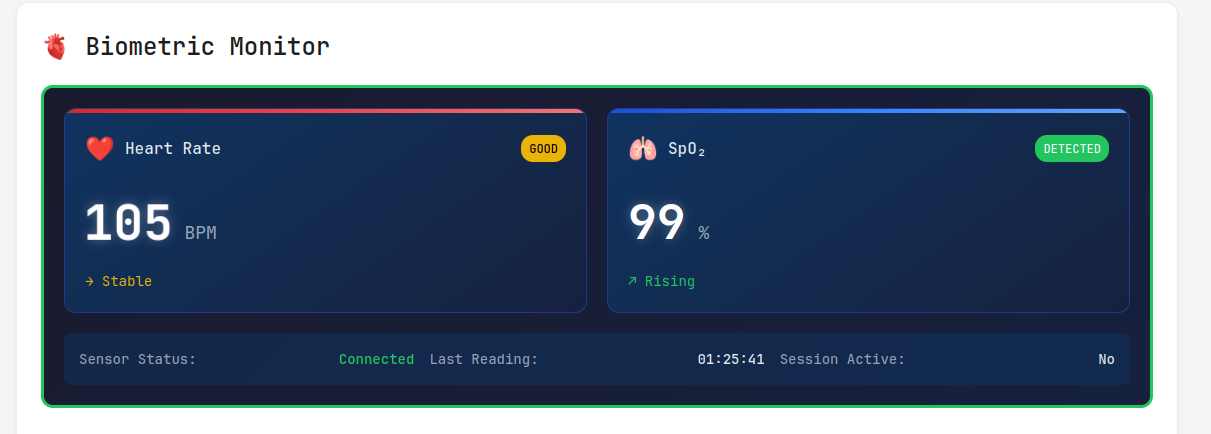
This data flows through the entire pipeline—MQTT → MariaDB → Grafana—giving us hospital-style biometric displays in real-time. This data has yet to be displayed in Grafana but as you can see above, is displayed in the web dashboard.
📊 The Results
The difference is night and day. Before, the system felt like it was constantly playing catch-up. Now? Butter smooth.
- Response times: Sub-100ms for all operations
- Data throughput: Real-time biometric streaming
- System stability: Rock solid, even under load
- Resource utilization: Actually using both cores properly
The web dashboard now shows live heart rate graphs alongside servo movement analytics. It’s like having a mini medical monitoring station.
🎯 What I Learned
-
FreeRTOS is powerful, but only if you use it properly. Don’t just slap tasks on top of Arduino code and call it multithreading.
-
Sensor integration is 90% debugging weird edge cases. That remaining 10% is actually reading the datasheet.
-
Real-time data is addictive. Once you see live biometric data flowing through your system, everything else feels slow. Even my partner was playing with the module and was impressed.
-
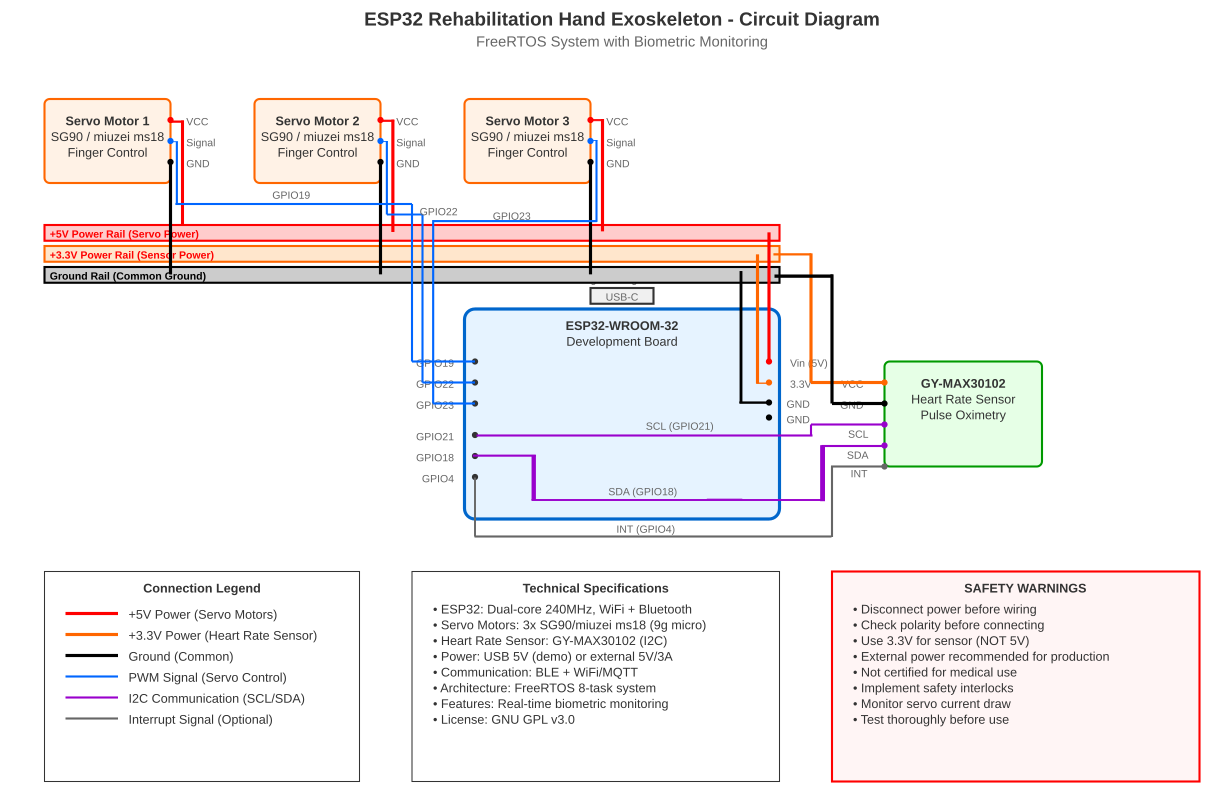
Documentation matters. I spent way too much time creating circuit diagrams and wiring guides, but future me will thank present me. I could of used a real circuit diagram software… buuuut I had to make the heart beat module on my own in inkscape annd… well I kind of did the whole thing in inkscape… Whoops.

🔮 What’s Next?
The architecture is now solid enough to handle whatever I throw at it. Next up:
- MPU-6050 gyroscope for motion tracking
- Pressure sensors for grip strength analysis
- Machine learning integration for therapy optimization (maybe)
But honestly? I’m pretty happy with where this is right now. It’s evolved from a university prototype into something that actually feels professional. Almost.
🛠️ Want to Build One?
The entire project is open source (GPL v3, because MIT is cringe). Check out the GitHub repo for:
- Complete source code
- “Professional” circuit diagram
- 3D printing files
- Docker Compose setup
- Comprehensive documentation
Fair warning: this isn’t a weekend project anymore. But if you’re looking to learn FreeRTOS, sensor integration, or IoT architecture, it’s a pretty solid start I think.
🎬 Final Thoughts
This project has been a masterclass in iterative engineering. Each phase taught me something new, and each upgrade revealed new possibilities. The jump from basic Arduino code to proper FreeRTOS architecture was particularly eye-opening. Being stuck on one thread with Arduinos now feels kinda sad. You dont know what you’re missing and all that.
Sometimes you need to completely tear down what you’ve built and start fresh. It’s scary, but it’s also how you grow as an engineer.
Anyway, that’s enough rambling for one week. Next time I’ll probably be adding gyroscopes or pressure sensors or who knows what else. This project has a habit of growing beyond my original plans.
Thanks for following along with my engineering adventures. Until next time!
P.S. - Yes, I know I said “next week” in the last post and it’s been almost two weeks. Engineering time is like dog years, but backwards.
Enjoy Reading This Article?
Here are some more articles you might like to read next: